This computer was actually built and sold in the early 1980's. It's a Tandy 102 laptop computer, and it can trace its lineage back to the original Tandy TRS-80 home computer. Yes, the "Trash 80." The computer that used up half its internal memory for a simple program called the "Dancing Demon."
But while other computers have gone to the scrap heap or the antique store, the Tandy 102 is still being used. Many newspaper reporters still file their articles on it and modem the stories off to the publisher. Turn the computer on, and you can access the built-in word processing or scheduling program instantly, no waiting for the internal software to "boot up" or run a virus scan. And it's amazingly cheap - you can get a Tandy 102 on eBay for about $30-$50, depending on condition. That's where I got mine.
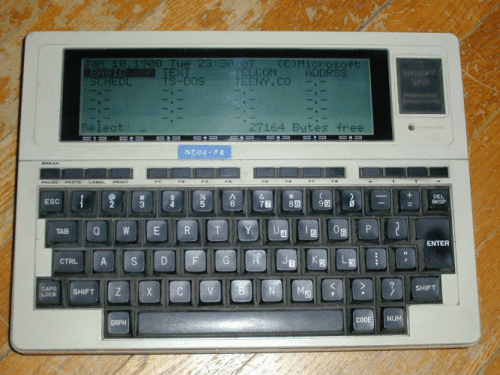
This is what I received. This computer has seen some serious use; its previous owner had to put a Dymo label on the faceplate to remind him which key to hit to access the menu. It originally only had 24K of RAM memory, I purchased an additional 8K upgrade on eBay for about $10. I would later add a ROM chip with a data transfer program. Tandy users, or those who are contemplating buying a legacy computer like this, should contact Club 100, a website devoted to the restoration and reuse of Tandy 100 and 102 laptop computers. I've already used this computer a few times, working on articles for various magazines and then uploading the information to my personal computer or to an IBM PC at a Kinko's.
Now before I continue with this story, some people are probably asking, "Chuck, why in blue blazes are you working off a dinosaur computer like this one, instead of plunking down some serious coin and getting a modern laptop?"
Actually, there are plenty of personal reasons why I'm going this route. My 102 is bare bones and ready for work. There are no internal DVD programs or computer games to distract me from my work. If the power starts to run down, I can add another four AA batteries and I'm back at work (you can get about 20-25 hours of uninterrupted battery life from four alkaline AA batteries). And it's virtually theft-proof - as in, "Who the hell would steal THAT thing?"
Granted, it's durable - but I wanted to see if there were some cosmetic customization techniques I could apply to it. I never heard of "case modding" before, but it's the same spirit that turned a Lincoln Continental into the Batmobile - a little modification here and there, the right paint job and some extra gizmos, and voila. After looking at some computer "case modding" websites, including Mod The Box, Applefritter, and Gideon Tech, I came up with some ideas on how to "trick out" my legacy laptop. Thus began Project Electric Blue 102.
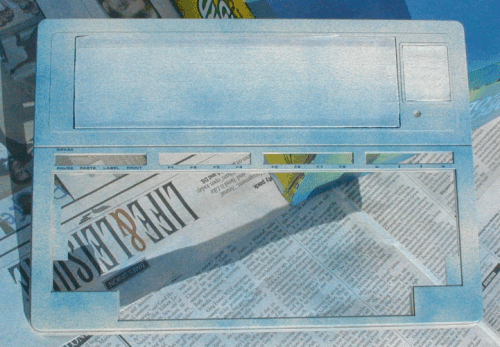
First things first - all Tandy 100's, 102's and 200's come out of the factory with a beige top. Do you know anybody whose favorite color is beige? Me neither. And as you can see from this photograph, the Tandy 102 in my collection looks like it's been used by about 15 other people before it came into my possession. Scuffs, wear marks, a Dymo label on the face, ecch. This is just SCREAMING for a makeover.
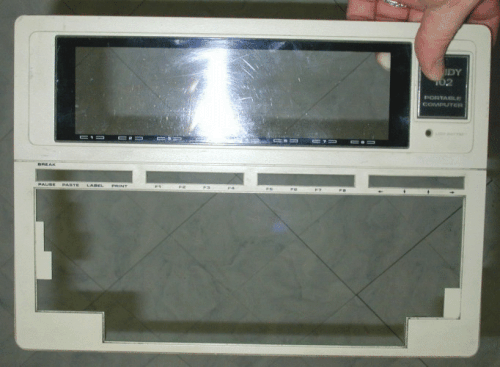
I removed the faceplate, ripped off the Dymo label, cleaned and dried the faceplate, making sure to remove any smudges or dirt. As you can see in this photo, the monitor window was very scuffed and scratched; I used Soft Scrub on a towelette to buff the scratches off.
I then used masking tape to cover the clear plastic face and the Tandy badge. The beige faceplate has some black lettering to indicate function buttons and directional arrows, and I was concerned that my paint job would cover up the lettering. Depending on whether it does or doesn't, I have planned for that eventuality.
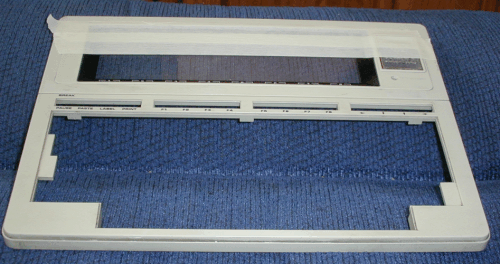
One of the things you have to remember when doing any spray painting, especially if you're dealing with parts that will be clear or need to be visible, is to make sure you tape up both sides of the case. This will ensure that you don't have dots of "overspray" popping up on the back side of your plastic window, causing your on-screen text to look spotty. I taped down the front and back of the plastic window, as well as the badge.
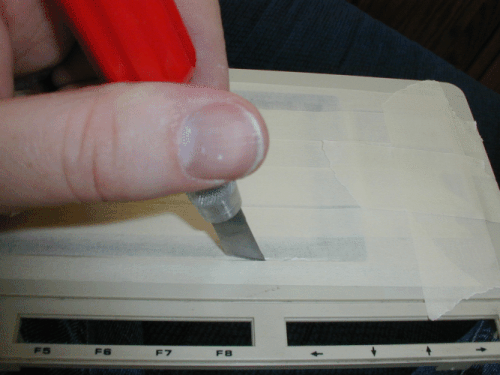
I then used a knife to trim away any of the masking tape around the window and the badge, so that the paint would paint exactly the portions of the cabinet that needed to be painted. This isn't as necessary on the back of the computer faceplate, just on the front. Make sure that you put at least two layers of tape on the plastic window, to make sure that no paint "seeps" through the tape onto the plastic monitor.
Now it's time to change the color of this case. There are different thoughts as to what paint or stains to use, which of course depends on whether you're paining a plastic or metal case. Since the faceplate is plastic, I decided on Plasti-Kote vinyl dye, which creates a very dull flat finish on the case.
One of the techniques that works best when using spray paint or vinyl dye is to first mist the surface with a light spray. Use sweeping motions, and start your arm movement and spraying before the spray hits the plastic. Then continue to spray until you've passed the plastic. Also, make sure that if you're using any paint or dyes, you apply them in a well-ventilated area (I used the garage, making sure there were no cars inside whose finish might attract some overspray). Also make sure that you have a dust mask and safety goggles, especially if you're wearing glasses - the last thing you need is overspray on your glasses, and you'll see blue spots on your lenses for the rest of your life. The first "misting" should cover approximately 50-75% of the plastic. Let it sit for 30 minutes.
Your second coat of vinyl dye should cover the entire piece, making sure to use sweeping strokes. Any overspray or runs on the plastic will eventually be absorbed into the plastic, so don't worry about making a mistake here. Make sure to spray all the edges and the interiors as well. After this spraying, leave the piece alone to cure for a good 12 hours. You will need to add one final misting coat on the faceplate, making sure to touch up any exposed beige areas.
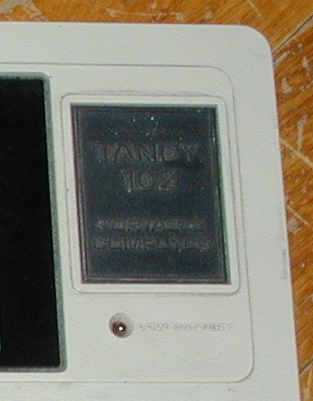
Once the dye has dried, you can take the piece back into the house and remove all the masking tape. If you remember earlier, I applied masking tape to the faceplate screen, but I also taped up the faceplate badge. This badge, like the plastic screen, is nearly impossible to remove from the faceplate without considerable damage. So instead, I taped up the badge. This is what it looks like before painting. Since I really didn't feel like adding silver or spray-on chrome or some other compound, I came up with an idea to at least snazz up the faceplate badge. I found at my local art supply store a collection of metallic markers. I purchased a light blue marking pen with a metallic undertone. I also picked up a fineline black Sharpie pen. I first went over the entire raised lettering on the badge, gently painting it with the metallic pen. I then took the black Sharpie and colored in the background.
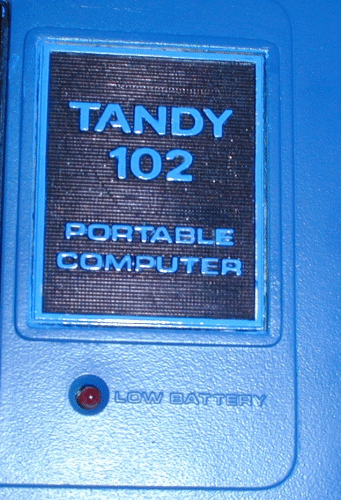
And as you can see from this finished example, it looks sweet.
After the painting, I examined the faceplate again. There were two types of lettering on the faceplate - raised letters that indicated a low battery or an input switch, which were not affected by the vinyl dye. However, several black letters along the function keys were covered up by the paint job. What to do, what to do...
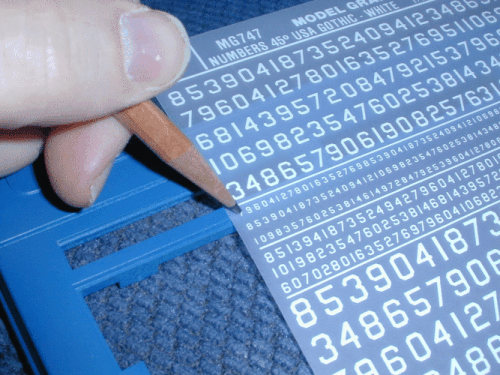
The solution was to order a set of white dry transfer letters and numbers. Simply take the sheet of letters and place it on your faceplate. Using a dull pencil or a burnishing tool, rub the top of the transfer paper. The letter will adhere to the faceplate surface, and when the paper is removed, the letter is now transferred to the faceplate. I did this to replace the function keys, as well as to re-label the rear input ports.
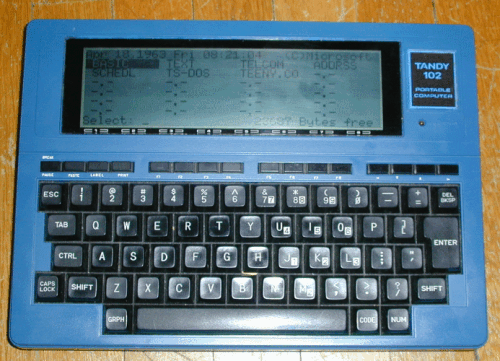
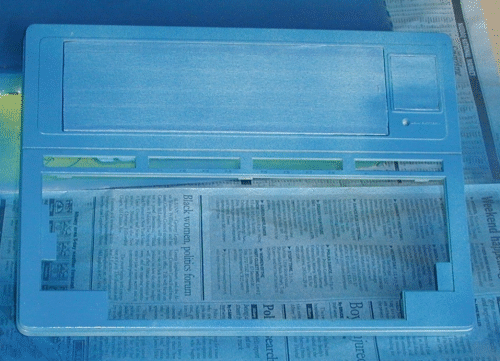
And this is the "after" photo. How's that for some serious shine? You might notice the Tandy 102 shows a date of 1963. Although you can program in today's correct month and day and time, this machine is not Y2K compliant. No matter - I just back-dated the unit to 1963 and nobody is any the wiser. I've already used my Electric Blue 102 in several "away-from-home" writing assignments, as well as for general notetaking and short composition.
Drop me a line with your comments on my Electric Blue 102.
|
|